Sunday, December 31, 2017

Last Post for 2017!

Well, managed to get a little time with the hobby over the last week or so. Here's some updates:
The Albion module was moved and the backdrop installed and partially painted.


Next, some switching operations with Alexander at the helm. Its been a while since anything ran on the Albion modules. Yes, the shingling on the potato house has begun!
Then some operations on the Deer Creek and Laurel, more fun for Alexander to watch trains run and do a little switching as compared to a lot of switching and a little running..


This weekend, I finally started the Albion station. Quite a bit of progress for the short time period. Happy with the results so far. Had to modify the windows a bit but they look close enough for my efforts! On to the new year! Let's see if I can't get Albion completed by September 2018, two years since starting the project only one year longer than anticipated. See you in 2018!


Wednesday, December 27, 2017

Back to the Sandy River and Rangely Lakes On2

Over Christmas break I had the chance to return to Al's On2 Sandy River and Rangely Lakes layout. He kindly invited dad and I over to operate the layout. Al uses NCE for control, which I also use, so I thought it would be a cinch.  However, he uses active braking on TCS WOW decoders, which I have tried but it had been a while..after pushing a few wrong buttons, I was ready to go! Al put a switchlist together on the fly for me and I grabbed number 15 in Farmington and off to make up the train.

I quickly goofed by pushing #8 instead of #7 on the controller for braking and  somehow cancelled the manual braking on the system. With the momentum on the loco and the lack of braking, I quickly called for help. Within seconds, Al had me off and running again with engine #19.
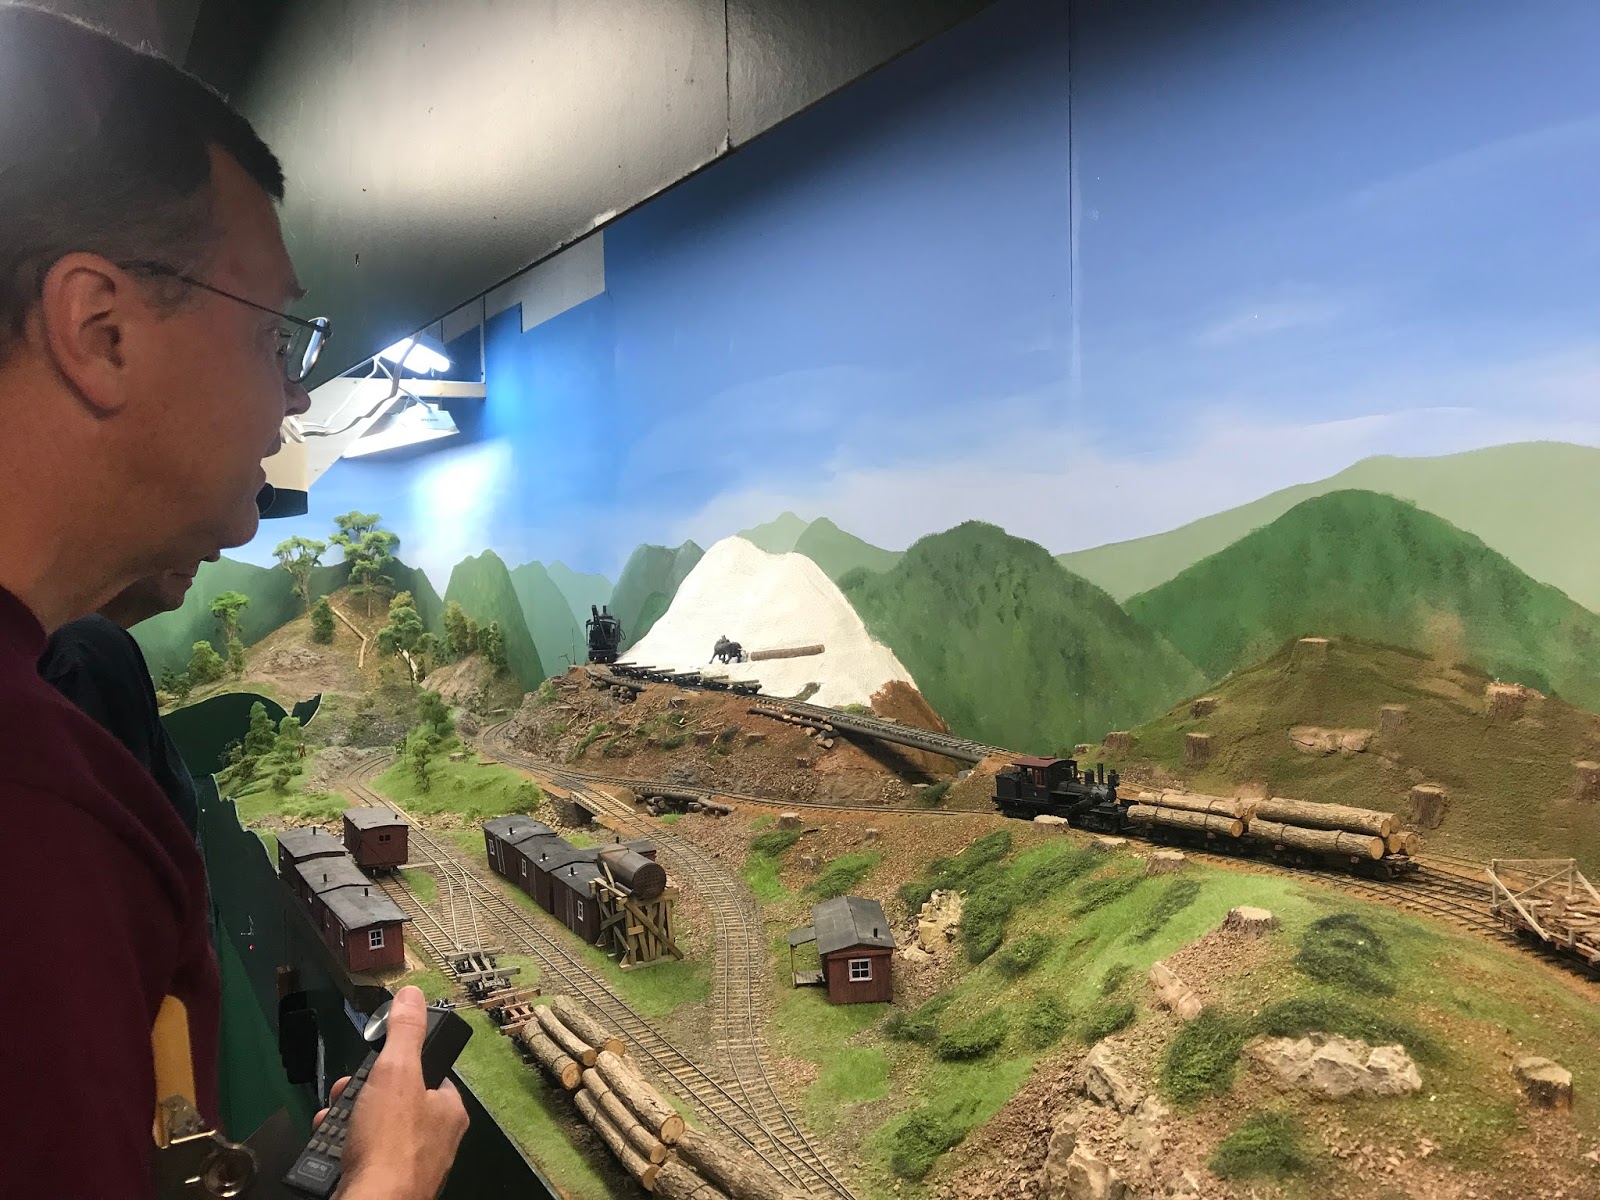
After making up the train, we headed North towards Strong. 
Stopped along the way for some some switching.

Pulled into Strong for some more switching. A couple of difficult moves, a few drop offs and a few pick ups and we were off again!


Switching the International Mill just south of Philips
Made it into Philips, more complicated moves. Hard to believe that Philips only had a two track run around given the traffic that passes through. While the line heads north, we were out of time. Had to head home. What a great opportunity!

A few observations:

This was by far the largest and most complete O scale layout that I have ever had the chance to operate. It was a BLAST! Took me about 3 hours, with talking, etc. to get from Farmington to Philips with a 10 car train, more or less. The ability to run longer trains and  rod engines was really fun.

I also liked using the momentum and braking functions. I think using these would be very difficult for new operators (I made a few wrong button pushes) but really adds to operation. I think I might set my WW&F up this way for a while and see how it goes.

Larger/Less better?
While switching in Farmington, a thought that I've had before re-occurred to me.  When you don't have enough room to model the whole, maybe a small part fully, could be more? For example, my layout space is only 21 feet long and 9-1/2 feet wide. No way to model the WW&F in O scale in its entirety. However, one could just model one yard, close to full scale or maybe two?  Al's Farmington really demonstrated how this could work. The yard is not all of 30 feet in length but close. Switching the train to get ready to pull out towards Strong was quite fun and took quite a while. I'd never had the opportunity to see this concept in action. It really worked well. Of course the passing sidings are closer to actual length rather than compressed for space, really fun just making up a train. Just an idea...........


Thursday, November 30, 2017

November Post

Work, life and biking have kept me out of the basement for the last month or so. Little progress to report, although I have located a "permanent" location for the Albion module, developed a plan for an extension (partial of Weeks Mills) and started the backdrop.

Over the Thanksgiving break I had the opportunity to visit Al Churella's wonderful On2 Sandy River and Rangely Lakes RR. Al was a wonderful host, allowing us to stop by during the holiday. His layout is a fantastic representation of the prototype. I had the opportunity to run a train over the layout, which ran very well. The experience also allowed me to cover the entire layout, and to get a feel of what operations would be like. Definitely a narrow gauge layout designed for some fun operations. I would love to get down someday to get a chance to participate in an operations session.

While working on the Albion module I have grown to like to the idea of focusing on a specific prototype. It allows you to really focus on the subject matter and to remove some distraction that freelancing allows (oh, I could add that, and that, and that). Al's layout helps reinforce how fun and challenging focusing on the prototype can be. Enjoy the photo's below!


Monday, September 18, 2017

WW&F On2 Tank Car Kit Completion

Looking at the Albion module this evening, I realized that I never posted the final tank car picture. So, here it is:

Personally, I'm not crazy about the light grey color but supposedly that's what they were.

The kit was produced by Portland Locomotive Works, they have a Yahoo Group for those interested. I got the kit for Christmas in 2016 and finished it recently. Here's the progression.

Started with the frame. Typical flatcar frame, easy going.
Next, I added the deck. Two things quickly became apparent. First, the end blocks were too far from the ends of the tank and the tank didn't sit well in the curved blocks.
First fix was to add some styrene to fill the gaps where the tank didn't sit well.

Next, I found some scale lumber to fill into the holes for the end blocks. Not perfect but unless you look really closely, you wouldn't know that they are there.
Next, I noticed the kit didn't contain any method to attach the tank to the car. It seemed unlikely that there was no attachment and sure enough the real Portland Locomotive Works drawings, provided by Ed Bond, showed how the tank was attached and the locations of the tie down straps. Turned out to be handy that dad stopped by the works years ago when they were still in business!


 I fabricated the straps out of styrene and brass wire with some NBW castings.
Then came the tank handlebar mounts. WOW! How in the world was I supposed to cut these off the 3D printing? The instructions suggested the use of a Dremel tool, which resulted in a 75% failure rate. Luckily, a quick email to Gary at Portland resulted in an extra set, no charge (Thanks Gary!). The next time I used a small wire saw and only managed to brake one!

The final result after painting. Well, you can see the results at the top of the post. An interesting build to say the least. It would have been cool if the WW&F had actually purchased these cars as projected. I'll use them on the module. Portland is talking about making the Brigton fuel tanks, so I might go ProtoFreelance for that part of the Albion module. Who knows, there's actually drawn plans for expansion.....

Sunday, September 17, 2017

Car Progress

Finishing some final touches on the B&H or B&SR boxcar. Added the roof walk and platforms, brake wheel, etc. The roof end platforms were a real pain, had to re-do them three times to get them level with the top of the car. Put the right trucks on it. Just needs a little weathering and some brakes on one of the trucks. I'm happy with how it turned out. Didn't add the B&SR lettering, since it sits on my WW&F module.


Getting closer with the WW&F passenger car and Sandy River Mail car/Combine. Turns out I don't have the right lettering, so I have to order some before the final coat of finish. Then the windows, then I'm done. Still waiting for my replacement sides for the WW&F combine. Emails to GME are going unanswered.


Sunday, September 3, 2017

B&SR RR Box Car

I did some horse trading a while back and picked up a Simpson B&SR RR box car #47 kit. I've always been a fan of the B&SR or B&H two foot in Maine. I like there track layouts, equipment, why just about the whole thing. Plus, I like shorter cars, as in 24-26 ft cars rather than the 30-32 foot cars of the "later years".

The kit was fairly well complete and ready to assemble. I had to do a few modifications. The scribed wood for the floor was all too wide, so I had to cut them down on the table saw. The steel corner posts are a but small but as per instructions, I could have made them out of styrene instead of the Gradtline castings. Finally, the scribed siding for the door seemed much to thick, so I substituted some thinner material. Its amazing how narrow in thickness narrow gauge car doors really are.

I used some 0.010 wire and some tin tape to simulate the tin roof. Think I need to use thinner wire next time. Here are some shots of the car before going into the paint shop. When it comes out, I'll add the roof walk, brake platforms, and brake wheel. A fairly quick kit to assemble and while its not WW&F, I'll be using it on the Ablion module.


Tuesday, August 15, 2017

Tin Passender Car Roofs

Last night I took the time to finish the WW&F Passenger car roof. I use aluminum tape designed for air conditioning and vent work repair - I think its what most use. I use the tape to represent the tin roofs commonly used on the Maine two foot equipment. It's easy to do but time consuming. Next up is the time intensive paint shop. I'll try to finish the SR&LR Combine/Mail car first.

Still no luck getting a replacement casting for the WW&F combine from GME. It's hard to build a combine when the sides don't match up. Been about 6 months since I contacted them. Getting frustrated, might just have to cut and glue one side back together.


Sunday, August 13, 2017

WW&F Coach and Tank Progress

Managed to get a little done this weekend on the GME WW&F coach and some final touches on the Portland Loco Works WW&F tank car kit.

Here's the vacuum brake and underbody detail for the coach. Glad to have this out of the way. I think the way I have it mounted will keep the brake rigging from interfering with the trucks.


End View

Side view with a test of Floquil Pullman Green. I found in the poor lighting, that it looks dark enough. My efforts with Scalecoat Burlington Green, turned out too dark. Might look nice in natural sunlight but too dark in my layout conditions.

While no information was included in the Portland Locomotive Works WW&F tank car kit regarding how the tank was held onto the car, a few calls to my father resulted in getting the original, "real" Portland drawings, which clearly showed four straps on the car. I made them out of styrene and brass wire.

Here's the car, per-paint with the straps.

Here's the tank with the first coat of paint. Looking much better. Can't wait to get it onto the car and be finished with this kit.


Monday, August 7, 2017

Op's Time and a New Loco

Today, I held another operations session at the house. Managed to get the Albion On2 module, the Arroyo On30, and the DC&L RY running at the same time. Good thing, as there were more operators than the DC&L could handle!

The DC&L ran fairly well. Despite my efforts there are still a few spots that are causing problems. Turnouts all. I may have to redo a few with the FastTracks jig. Despite my pride of originally only having one turnout built on the FastTracks jig, it is one of the few turnouts that has never given me the slightest problem. Frustrating for me but I think everyone had a good time. Mark gave the new trackwork on the mountain a thumbs up, which was encouraging.


Steve, Chris and Alexander have a three way meet at Hawley Jct. All went smoothly. Fun to have a friend from 30 years ago come and see the layout and to have my son, seven, participate.

Somehow I managed to get the new Class A Climax up and running before the meet, then forgot the address! Opps. It's a car works Class A that I picked up on Ebay for a deal. Didn't run when I got it but with a decoder and keep alive installed and some drive train work (glue on those GrandtLine gears and modifying the pickups) it runs smooth, quite and like a champ.

Next time I decide to have an operations session, I'll have to run a few more trains to pick out the trouble spots. Till then, back to Albion, I think.......

Monday, July 10, 2017

DC&L Steaming Along

Been working a little in the evenings on the DC&L RY. Its been a while so the track needs a little cleaning and a few items need fix'n. Here's a test run of the coal train. Running loads to the mines in prep for the next operations session. Things are running well but I need to add a stay alive to Climax no 9 and a headlight bulb, neither will likely happen before the meet.


Been going back and forth on whether to move the logging camp down the mountain to Hawley Jct or leave it on top of the mountain. Current thoughts are to move it to the bottom, both the camp and logging scenes just look better this way. Not what I had panned though. If I leave the camp up top, it's just too crowded looking. Less is better? Plus, if you have a logging camp, might as well be able to see it! Till next time.......