Tuesday, December 22, 2020

Albion Get's a Flanger!

 Just in time for winter snow, Albion has a new flanger. The WW&F always kept a plow and flanger in Wiscasset and in Albion just in case. While this particular flanger usually stays in Wiscasset, today its in Albion. The flanger started out as a Sandy River Car kit but most of the scribed siding had to be replaced as it was improperly cut. I added interior details based on the drawings in the WW&F book set. I think it makes a nice addition to the scene. Now, to make those small side windows......


Sunday, November 29, 2020

Upper Wiscasset Gets a Car Shed

 I recently finished the car shed for the upper yard in Wiscasset, otherwise known as staging. The car shed existed sometime between 1900 to sometime prior to 1910 when it burned down. After the WW&F lost the coal contract withe the woolen mill in North Vasselboro, they built a coal shed on the site. While I am modeling a time when it is likely the car shed had already burned down, it was a convenient structure to have on the module for.......storing cars. Yes, the shed was painted yellow, I actually used a more toned down yellow as bright yellow was just too much! The structure has been done for a little while, however, I just completed the window glazing.


 Here are some shots from while it was under construction


Sunday, October 25, 2020

DC&L RY Number 3 and 4 Back in Service

 I have been very slow to replace/return the two WOW decoders in two separate engines that I have. Both were purchased and installed at the same time and both failed at the same time. The fist is a GrandtLine porter that I build when I was 1in high shcool and rebuilt several times adding DCC in the last rebuild. Tight fit for the speaker, decoder, and stay alive. The Flying Zoo Climax also has a very tight fit for both the decoder, stay alive and small speaker. They were a BEAR to get in there. All those blasted wires and tight spaces! So, when the decoders sound failed, I checked with the folks at TCS about the issue, sure they are under warranty, just send them in. Problem - taking them out and putting new ones in was likely to cause breakage on the models and require more effort than I wanted to put in. So, they have sat for, well, a long time. 

So, instead of removing them, sending them in, and then installing them when they came back, I ordered new decoders and decided to swap them out. Get it over with in one difficult time. 

 The Porter

No. 3. is a plastic GrandtLine porter. I replaced the TCS WOW decoder with a new Tsunami 750. Soundtraxx decoders work so much better with those German Faulhaber motors. I think the 50:1 gears in the motor make them difficult to control. No idea but I have similar problems with PSC shays that use the same motor. The Tsumani 750 is slightly smaller than the WOW decoder and accepts the TCS stay alive. So, having slightly more space allowed for a much easier re-install than expected! Up and running in a little under an hour!


Flying Zoo Climax 
Replacing the TCS WOW decoder on the Climax was even easier! I forgot that the wires on WOW decoders have a wire harness for both ends! I just unplugged each and plugged the new one in. Very easy. The biggest problem with both of these installs was getting the wires just the right length. Not too short, not too long, and getting them all soldered together in a tight space with them moving all around. Since I didn't need to cut any wires or solder for this replacement - BIG SIGH of relief. Back up and running! Sounds GREAT. Amazing sound for such a little speaker. I think TCS has improved their motor control, as the engine ran great with no changes to motor control CV's. 


Bottom line. I'm really happy that I dug into this project. I'm happy to get both fine looking and fine running engines back up and running. Now, to send those two TCS decoders back for warranty, hope they will still fix'em, I have two engines waiting. 
 
Here's a short video of the engine on a runby
 
 
Cheers - Brian


Sunday, October 11, 2020

Albion- Upper Valence and LED lights

 I decided to tackle a project that I have been putting off for a LONG TIME. I've needed to put the upper valence and LED lights over the Albion module. I managed to get them up over the upper Wiscasset Yard module but thought with the odd shape, Albion would be a challenge. Not too bad. Last of my LED's.

 Here is mid way through. The framing.

Next is the nearly completed project. Still some painting and other items to finish.

 
Both together
 
 
Upper Yard with backdrop painted


Friday, October 9, 2020

October Coal Train

Some Coal Train Action in October, just before the leaves changed


Wednesday, September 2, 2020

Log Train on the DC&L RY

 Welcome to September! I've done some small scenery work on the DC&L RY the last week or so and taken some time out to run  a train or two. Here are some shots that I recently posted on the O scale Narrow Gauge Facebook page. Seems like there really isn't an On3 page on Facebook. That's just fine. I'm back to looking at photo's to see what's missing from scenes and trying to tackle getting those item done.


Saturday, August 22, 2020

Git er Done Mode!

 So, a while back I was going to take some pictures while operating the DC&L RY, a nice shot of a log train at Hawley Junction waiting for the local to pass by. Great shot till you noticed the unfinished bridge and scenery in the background! It finally got to me! I had torn out a completely good and functional bridge on the logging line because I wanted something more "back woodsy". That was likely two years ago? 

So, I said let's just get it done and work quickly, worry about quality later! So, here we have it, the completed log bridge on the logging line. I think it came out ok, good enough for now. At least it looks finished.


At the same time, I decided it was time to fix my "mock up" of the logging camp which I had moved down the mountain.  While it is still in "Git'er done" mode, it's coming along nicely. A bit small but that's all the space I have  for it. I think it gives the overall feel of a logging camp. More little details and scenes will help it fit in a little better over time.


Finally, while cleaning up a bit, I found a passenger car kit that I bought off ebay in 2000! Yikes! in the box for 20 years! So, Git'er done or get rid of it. It is a Star Models resin kit. Had some serious warp in the bottom casting. I got it out using hot water and weights but it creeped back in a bit before I got it glued. "Git'er done" meant I went with it! I now realize that the roof has to be glued on. Interior or no interior. That is the dilemma..............let's think about that a while............

Sunday, August 16, 2020

Wiscasset Yard to Albion

I recently took a little time to do some switching on my On2 Modules. Track work on the Wisscassett yard has been completed for a while and I have been using some car cards and switch lists. Working out the "kinks" like finding out that the guard rails are a little too close to the rails and need to be moved a bit. 

A whopping two car train and combine takes about 40 minutes to run from the Wiscasset yard to Albion and back. Interesting that such a short train can provide such fun. 

Here's the No. 7 setting up the train. That's the original car shed that was located in the Upper Yard in Wisscassett. While it was gone by 1910, I felt is was a better fit for the module than the gaint coal shed that came much later than the time period I model.

The train pulls into Albion, passed the coal shed. Wait, that combine doesn't look quite right?
 Spotting Cars
 Crossing the road to Tilton's Potato House.


Friday, June 12, 2020

Arroyo Tank Car Revisted and More

I recently finished up, i.e. painted, a couple of On30 projects that have been ongoing.

First is the new Arroyo Tram tank car. The model is my version of the Gilpin Tram tank car that was built in the C&S shops. The tank car was used to haul water to mines that had "bad" water for their boilers.


I also finished up and painted a Chivers Finelines flatcar, freelanced but based on the Gilpin cars. My last such kit. Sorry to see them go out of business.

Modern Cars........

Here are two all steel ore cars based on the old Roundhouse or Model Die Casting ballast cars. Years ago, I had seen a kit-bashed version similar to these. I have no idea where I found the picture but I liked it and picked up a kit to bash.

Long time later........I bashed this up so quickly that I bought a second one on ebay, super cheap. The only difference between the two is how I did the ends and where I located the chain turning mechanism to open the drop bottom doors.


I wanted to use trucks that have brakes that hang from the trucks, as per Gilpin style but SlimRails or the "new" Chivers Finelines closed down a few years back. So, while looking at Tichey archbar trucks, I wondered if they could be modified? Yes! A fairly easy and quick conversion though I had to wait between steps for the adhesive to dry completely. I think they came out very nicely and plan to modify a few more. I was even able to use the brake shoes that come with the truck kits.

The Chivers Finelines trucks are on the left and my modified Tichey's are on the right. Yes, I used smaller wheels to get the right coupler height but one could easily use larger Kadee wheelsets. The picture is mid production, so only one set of brakes is shown. The finished and painted trucks are in the picture of the completed car above.


Tuesday, May 26, 2020

Pandora's Box - On2 Musings

During a short period of free time I decided to take out a locomotive I had put away years ago (don't think its seen the light of day in 20 years...). I figured I could throw a cheap DCC decoder in her and get her back up and running, a quick project, right? No!


After installing a test decoder (no sound) I tried to run the locomotive. The gears on the rear truck did not mesh! Ugh. This had been a problem on this engine for a long time. I had never really been able to figure it out and had put  the loco back in the box several times. At one point I had managed to get the trucks "perfectly" bent so it ran fairly well. This time, I had to FIX IT! So, disassemble, re-assemble, test, disassemble, re-assemble, test, etc. etc. Then I began to notice that the truck was able to free rotate on a shouldered screw. I assumed it was to help the engine get over rough track, however, there was still too much play in the truck. The truck side frame had enough play to keep the  bevel gear from properly engaging with the pinion gear.


My first thought was to file the screw threads down to a little but determined it was the shouldered part that was too long. So, I made brass shims (the hole large enough to pass the shouldered part) and installed them with much fussing  (getting those short screws in and then turning the screw with the screw driver angled!).  IT WORKED!! After 3 times the amount of allotted time, I got her back on the track and running better than ever before.....now for that sound decoder, maybe tomorrow!

One good deed..........

The satisfaction was so great, I decided to get out another quick project! Yeah, right. So I pulled out
 another long term project. I thought I had put it back in the box because it really needed extra electrical pickups added and I hadn't wanted to do that at the time. I had re-motored the engine and installed a DCC sound decoder and stay-alive capacitor. The stay alive and stock poor pickups (one side on the drivers, the other on the rear truck) just weren't enough. Generally speaking, there are a fair amount of these out there in On2 and I haven't read much about issues with them, then pandora's box was opened!


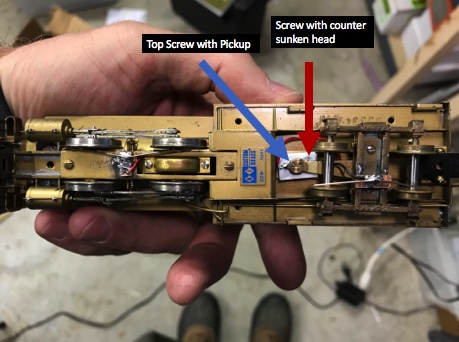
So, I carefully, and I mean carefully added electrical pickups to the front and rear of the engine.  Did I mentioned that I was careful, so I wouldn't have to mess with moving or re-wiring decoder "stuff". Well, when running it, I found an intermittent short. I'd noted in the past that the method of holding the rear truck caused shorting issues on this engine even with DC, however, I thought it had been fixed on this engine so it MUST be my additional pickups, right? Disassemble, check, assemble, check, disassemble, check.  Ugghh...


 Turns out the truck mounting hardware would occasionally rub against a countersunk scew-head that was supposed to be isolated. Bad planning on the builders part, I'm thinking. So, using two strips of different thickness styrene, I managed to come up with a little better system to assure the screw head was isolated. Vola! It worked. During this project I had to put it down and walk away for a day. DCC sound decoder wires and problems can be super frustrating. All that handling can lead to a secondary issue. Well, she runs great now but even with the extra pick ups she needs to have that stay alive fully charged before taking off. As for painting, yeah, another day as I have to disassemble the engine...........another of Pandora's Box if ever there was one! Cheers!

Sunday, May 17, 2020

Deerfield Laser Taconnet and Vassalboro in On2

Last year I picked up two Deerfiled Laser Kits from someone online. They were selling the laser kits with two Bachmann passenger car bodies, roofs and trucks for $50.00 each. That looked like an interesting deal so, I jumped in. I've posted previously on cutting the roofs for narrowing, etc. so I'll focus here on the finished cars and compare them to the GME resin kits.

First the Taconnet.  The baggage doors are a bit wider, the windows more square and the car is shorter in stature. I am definitely glad to have added the trim under the windows, as it would really be missing on this car.


The Vassalboro. Relatively similar. I'm glad I added the under window trip. The lack of rounded corners isn't too bad as painted. I think the square windows look better.


Conclusion? Well, the GME is the correct width and height. The Deerfield Laser kit is an 1/8 short but has square windows. The GME doors on the Taconnet are a bit  narrow.  Neither is perfect, both have some limitations. Both work just fine for me. Buid'em and let me know your thoughts.

Both sets are cars were painted with Floquil Pullman Green and Oxide Red roofs. The GME has Floquil Oxide Red and the Deerfeild has Polyscale Special Oxide Red. The GME's were finished with semi-gloss and the Deefield laser kits finished with Gloss.